
Amsterdam houseboats for annual lease, the Amsterdam apartment alternative
Amsterdam Houseboat rentals
Watergruwel 19M studio
Vrij Muselaer 25M 2 bed
Realengracht 25M 1 bed
Living on a houseboat in Amsterdam
Amsterdam woonboten te koop, houseboats for sale
Putting a floor in a barge houseboat;
There are different philosophies about the right way to do this.
Some say the floor should be in panels, so in the event of a tiny leak, you can find out where it is.
Leaks are rare; but they happen sometimes see; Leaks in riveted steel hulls
The trouble is, that tends to make a poor floor. I prefer to make a tight timber floor from solid planks; that's just a personal preference. I often leave the center boards so they can be lifted out, which is a compromise. From the center you can look in to visually check, and if necessary remove more planks until you get to the problem.
However you decide to do it, you'll need a solid, level set of floor beams to build on. Generally, our old barges' old steel beams don't line up very well. you can use stretched piano wire, one down each side, and carefully set the wooden beams just under them. Or you can rent a spinning laser. I actually think the piano wire is easier in most cases.
Sometimes I weld new steel beams in first; a bit higher than the original bottom beams. That makes it possible to raise the new floor above the curve between the side and bottom of the hull, making a right angle between your new floor and wall. Otherwise every piece of furniture will have to be custom made. The other [usual] method is to build a "step" box down the length of the inside of your boat. this seems like an easy answer, but it's a real pain ever after. If you can avoid the step, do.
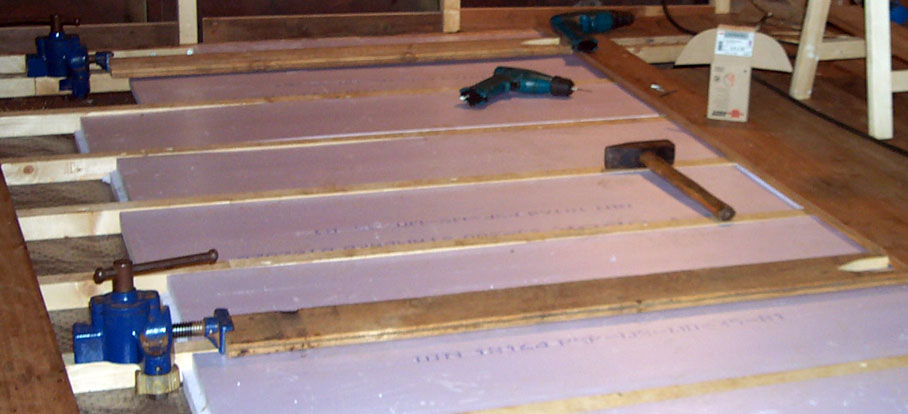
Whether you use new steel beams or the old original ones, lay wood on top of the steel so that it's very planar; that is, it's flat. Since you can't usually use a spirit level on a boat, you need to line it up with a long straight edge or two, and stretched wire. Run a wire down each side, 10mm above the intended floor height. set a straight edge across at each end, then get down and sight across the whole room so you can see if the two straight edges are parallel. Take your time with this process, until you have it right; the whole rest of the job will be built on this.
Set your wood [or steel if you're laying steel first] 10mm under the wire, fixing one out of every 4 beams or so with care. After that, you can set a sturdy straight beam over each side, and clamp your next floor beams under them so they're level with the first ones. This goes quite fast.
How you choose to attach things will depend on your boat, your skills, and your plan. If you're putting wooden beams on old steel, you'll need to use shims and make cunning little cuts here and there. if you drill a 5.2mm hole, you can use standard 6mm chipboard screws. they'll cut right into the steel and hold securely. If the steel is more than 4mm thick, use a little grease or soap on the screw to help. These screws are MUCH cheaper than the specialty screws sold for the job, you can get them anywhere, and you can use the same screws for your woodwork later.

These wooden beams are set next to the old stringers of the 100 year old hull. I did it this way because of limited headroom in this area. there are new steel beams under the wood to hold it up.
If welding new steel beams in over the old ones, then I like to nail the wood to the steel with a cartridge hammer [scheithammer in Dutch]. It works well if the beams are straight and there are no shims required, and it's very fast. On the negative side, it's very hard to get it apart again if you've made a mistake. It shoots special nails through the wood and right through up to 6mm of steel.
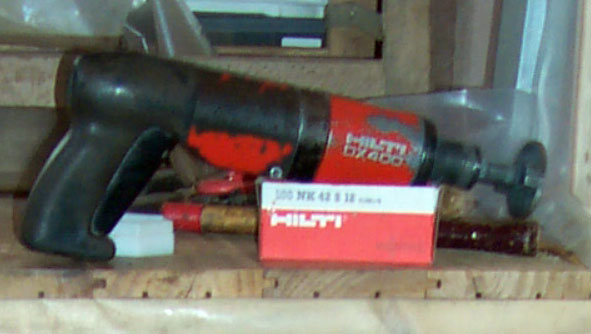
Use "floormate" high density blue polyurethane insulation between the beams. If you're going to use solid planks, then you don't need an underlayment. If you want to use a click parquet, then you do. In the picture below, I've laid a plastic vapour barrier on the new steel beame, set woon on top and nailed it with the cartridge hammer. After fitting PU bord beteen the beams, I'm screwing teak floorboards down.
Below each wooden beam is a 50x50mm steel angle iron. Any gaps in the floormate are filled with squirt-foam, the planks are screwed down with many 3mm screws through the edges, invisible when done. 10 years later, this floor still doesn't have a spot where you can slip a piece of paper between the boards, and there are no creaks when you walk across.
If this page does not display properly in your browser, please let me know!
Home | Contact | Terms | Realengrachtt | Vrije Muselaer | Watergruwel| FAQ |
| Amsterdam Links | houseboat tips | voltage regulator for dc alternators Pressurized Kerosene kiln burner India motorhome