
Amsterdam houseboats for annual lease, the Amsterdam apartment alternative
Amsterdam Houseboat rentals
Watergruwel 19M studio
Vrij Muselaer 25M 2 bed
Realengracht 25M 1 bed
Living on a houseboat in Amsterdam
Amsterdam woonboten te koop, houseboats for sale
Amsterdam houseboat sewage connection;
The city of Amsterdam has installed sewer connections for all houseboats in the city.
The boats need sewage ejection pumps to push the waste out into the sewer system. This is fairly technical, and most folks will hire a professional to do the job. But in case you want to know, here's my Amsterdam Houseboat sewer connection page.
Rules;
The houseboat owner has to feed all the onboard drainage into the pump unit, and it must be connected to the sewer system. The penalties are very severe according to the official website, with fines in the thousands. Nothing should drain into the canal [except rainwater].
The pump;
I made a pump unit using a stainless steel beer barrel and a shredder pump. It took a long time to get all the bugs out of the system, and altogether I have to admit it wasn't a worthwhile project. Even though factory made pump units are expensive, at around €2000, it's the way to go. The units are robust and can be repaired and cleaned out easily. A shredder is not necessary according to waternet.
The pump should have a minimum output pressure of 0.8 bar.
The installation;
Since every boat has been converted to the system now, there isn't much to say about it.
Your washing machine, dishwater, all sinks, shower and bath also have to run to the pump unit. when you add plumbing or appliances, it has to be kept in mind. On large boats, it can sometimes be a challenge.
You can have separate ejection pumps and run the outlets into one tube, but you need special waste check valves, and all the pumps need a fairly high output pressure. So most installers use the one main pump, and if necessary, use cheaper low pressure units to lift the shower water up into it. Washing machines and dishwashers have their own little pumps in them, so it's usually not too hard to plumb them.
The output tube can be a flexible hose, but it has to be the right kind; odor resistant waste hose. On the section outside the ship, it should be insulated and [in my opinion] heated too. I don't like those "thermalint" anti frost heating lines, even though they come ready to use. Every single one I ever installed failed with a couple of years. I like the "raychem" heat lines. the wire can be cut to any length and connected to 220V. You have to add an end connection and cap the far end [I use sikafex and a piece of tubing]. You should also have a thermostat to switch it off when the outside temperature is over 3C. I use a universal type with feeler [about €15]. The thermostat stays inside, and I drill a little hole for the feeler to stick through to the outside.
It's more work, but every one of these I ever installed is still working, and they work well.
The raychem can be hard to source, but I found someone selling it on "marktpaats" .com. just search for raychem.
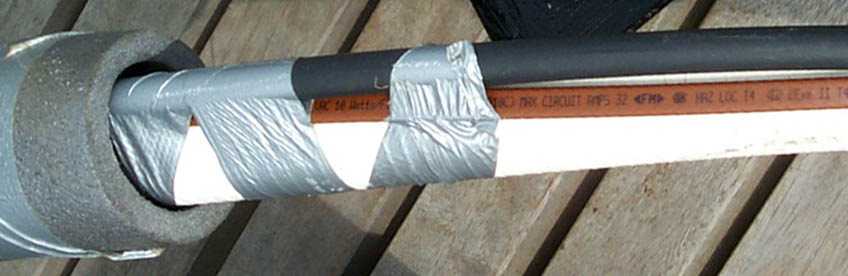
On the picture above, I've made a single assembly from a tylene water supply hose, an odor proof sewage hose, raychem anti-frost cable, and an insulating cover.
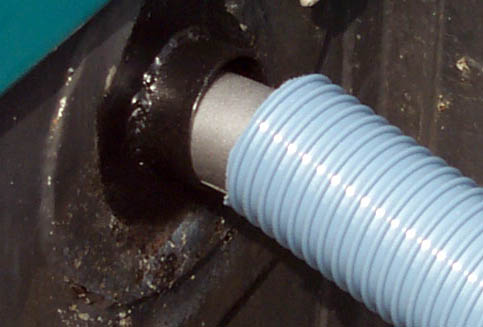
I weld a collar onto the hull, then put the outer weather hose on it with a hoseclamp. The hose is available from Rutrans. I only use the outer spiral one where the tube is outside in the weather.
Connections at the wall end differ.
Dangers and cautions;
My insurance inspector told me of a case where the pump failed due to frost, then the checkvalve failed, then the main sewer line in the road got blocked, all while the owners were away on holiday. There were 80 apartments also using the that sewer, all much higher than the boat. The owners came back to find it nearly sinking, with 40 tons of sewage inside. The boat was a total loss.
The electrics have to be reliable, I recommend installing a separate circuit with its own gfi [ardlekshakelaar]. The check valve is vital, so make sure it's a good one, and installed in the right position. They have a ball in then that falls in by gravity.
The pumps will cycle even when you haven't used any water, this is due to back leakage through the check valves. It's pretty much impossible to avoid completely, but a quick fix is to fill the kitchen sink with clean water and then drain it through.
Not flushing toilet paper is good practice too. If you must use paper, choose a type without cotton fiber in it (generally speaking, the cheap stuff).
If this page does not display properly in your browser, please let me know!
Home | Contact | Terms | Realengrachtt | Vrije Muselaer | Watergruwel| FAQ |
| Amsterdam Links | houseboat tips | voltage regulator for dc alternators Pressurized Kerosene kiln burner India motorhome